

I’ve set up the NetDocuments–Centerbase integration at many law firms, and the setup itself takes minutes. Turn it on, map a few fields, and Centerbase clients and matters automatically become NetDocuments workspaces. You stop maintaining the same list in two places.
The setup isn’t the hard part. The hard part is knowing which of two scenarios you’re in — because getting that wrong is how you end up with duplicate matters all over your cabinet.
Before You Start: Make Sure You Have the Right Credentials
You can’t do any of this with a standard user login. Two things you need up front:
- NetDocuments: repository admin. You need repository admin rights, mainly so you can actually back up the client and matter profile tables (more on why that matters below).
- Centerbase: access to system settings. You have to be able to open up system settings to make these changes. If you can’t open system settings, you’re not turning on this integration. Full stop.
Sort this out before you schedule anything else.
Scenario 1: Brand New to NetDocuments, Already Using Centerbase
This is the easy one. When you turn on the integration, Centerbase gives you the option to push all clients and matters into NetDocuments. Since your NetDocuments account is empty, there’s nothing to conflict with. We turn on the integration, push everything over, and Centerbase builds the client and matter tables from scratch. Done.

This bulk push is really the only time I use that option.
Scenario 2: Existing NetDocuments User, New to Centerbase
This one takes more time, and it’s where firms get into trouble. I generally do not push all clients and matters over in this scenario, because I’m worried about duplication. Instead, the work is making sure the fields in Centerbase match the fields in NetDocuments before the integration ever gets turned on:
- The client ID in Centerbase matches the client ID in NetDocuments
- The client description in Centerbase matches the client description in NetDocuments
- The matter ID in Centerbase matches the matter ID in NetDocuments
Sounds simple. It usually isn’t, because of how those fields are actually labeled.
The Matter Sequence Number Trap
For most of my Centerbase customers, we are not linking the Centerbase matter ID or matter number to the NetDocuments matter number. We’re using a field called the matter sequence number.
Here’s why. Centerbase stores client and matter numbers in three separate fields:
- Client Number — On both the contact and matter record. This is the client’s ID number.
- Matter Sequence Number — The matter’s number without the client number.
- Matter Number — The Client Number + Matter Sequence Number combined.
So if the Matter Number is 123.003, the Client Number is 123 and the Matter Sequence Number is 003.
Most NetDocuments implementations store the client number (123) and the matter number (003) in two separate attributes, one the child of the other. That’s why binding to the Client Number and the Matter Sequence Number — not the combined Matter Number — is the most common integration setup.
My Rule of Thumb: The Five-Matter Test
Before you turn on this integration, go into Centerbase, pick five random matters, then pull up those same five matters in NetDocuments and make sure all the fields match. This is also how you figure out which Centerbase fields to map — you’ll typically see that the matter number is the client and matter number put together, and the matter sequence number is what you actually want.
I cannot stress this enough: every firm does this differently, so you’re going to have to actually use your eyeballs and compare.
Here’s a real example. At the last firm we set up, the Centerbase matter sequence number was padded to four characters — matter one was 0001. But in NetDocuments, the matter ID was padded to three characters: 001. That’s a complete mismatch across every single matter. When you find something like that, you have to clean it up before going live. In that case, we opened a support ticket with Centerbase and had them change all the matter sequence numbers to three characters.
Walking Through the Integration Settings
In Centerbase, go to System Settings > Document Manager > NetDocuments tab. This is where you turn the integration on.
Here’s a generic example of how most of my NetDocuments–Centerbase setups look:
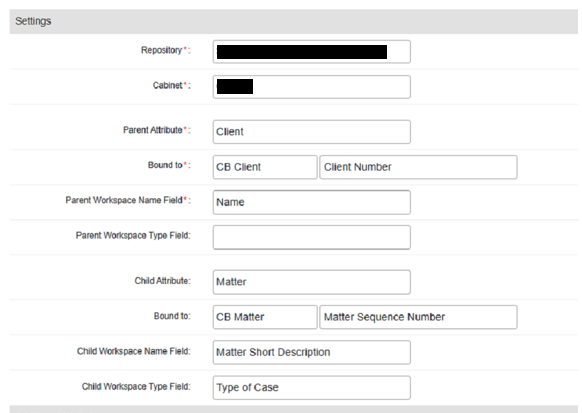
- Repository and Cabinet — These will be different for every setup. The cabinet should be named after the client.
- Parent Attribute — Usually
Client, unless the firm uses a word like “Case.” It’s bound to CB Client using the Client Number field. In Centerbase, that’s theClient.Client Numberfield — and it needs to match the client ID in NetDocuments. - Parent Workspace Name Field —
Name. - Parent Workspace Type Field — I almost never fill this out. If a firm were only using clients (no matters), there’s a chance I would, but it’s rare.
- Child Attribute —
Matter, bound to CB Matter using the Matter Sequence Number (see the trap above). - Child Workspace Name Field —
Matter Short Description. This is where I compare the matter short description in Centerbase against the matter description in NetDocuments. If the firm uses a different field, change it here. - Child Workspace Type Field — Optional but useful. This firm used
Type of Caseto distinguish litigation vs. bankruptcy vs. med mal. I like bringing that over — open a matter in NetDocuments and the type shows right on the workspace. Find where that lives in Centerbase (here it was theTypefield) and map it.
For the official documentation, see Centerbase’s NetDocuments Integration article.
One Last Safety Net: Back Up Before You Start
Before I turn anything on, I go into NetDocuments and download the client and matter tables as CSV files. If I screw this up and duplicate all the matters, I can restore from those backups. It takes two minutes and has saved me more than once.
Admin Console –> Profile Attributes
The Bottom Line
Two scenarios, two approaches:
- New to NetDocuments, existing Centerbase user — Straightforward. Turn on the integration and push everything from Centerbase into NetDocuments.
- Existing NetDocuments user, new to Centerbase — Slower. Verify every field matches before turning on the integration, whether you’re pushing everything over or not.
Either way: back up your tables, run the five-matter test, and use your eyeballs.