
Before we go into this topic, we need to bring up two points.
1. You can Convert any Word Document to a PDF when emailing the documents

2. You can Convert any Word Document to a PDF when uploading a document to a website.

90% of time we convert a document to a pdf when we go to send it to a client or upload it to a website. Since NetDocuments has addressed that in its work flow, why do we need to convert them to PDFS and save them into NetDocuments?
For most people the PDF is an indicator that the document has been filed with the court or sent to a client. I have a couple of suggestion for that:
1. Create a Profile Attribute called Filed. When you file a document, change the value to YES
2. Use the Approved Button as an indicator that the document has been filed

3. Rename the Document and add the word FILED or Sent to the document.
Now that I have explained those methods, lets talk about how we can easily turn a Word document to a PDF:
Option 1
Step 1: Open up your Word Document in MS Word
Step 2: Click Save as –> ND SAVE
Step 3: Change the Save as type to PDF

When you look at the document in NetDocuments, it will have a PDF Icon instead of the Word Icon

People don’t like that because they don’t see the word icon. If you click on the version number, you see version 1 is a Word Document.
Option 2
Step 1: Open up your Word Document in MS Word
Step 2: Click Save as –> ND SAVE
Step 3: Change the Save as type to PDF
Step 4: Uncheck the Official Version option.

If you login to NetDocuments the document will still appear as a word document.

You can click on the version number to get to the pdf. People don’t seem to like that either. They want to see the Word document and the PDF Document next to each other. That is a “Windows Folder Concept”.

Option 3
Lets do this one more time.
Step 1: Open up your Word Document in MS Word
Step 2: Click Save as –> ND SAVE
Step 3: Uncheck Save as New Version

Step 4: Click in the File Name
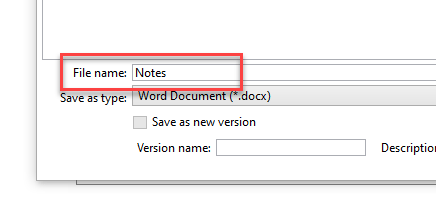
You need to add a character, and then remove it. So, after Notes, type in the letter a and then remove the letter a. This will unlock the Save as type so you can change it as a pdf.
Step 5: Change the Save as type to PDF

This will give you the two documents side by side.
