This integration has changed throughout the years, but this article contains the most updated information on using NetDocuments and ScanSnap.
If, for whatever reason, this method doesn’t work, go back to this method: https://optiable.com/netdocuments-and-fujitsu-scansnap-third-times-the-charm/
PART 1: Installing the NetDocuments ScanSnap Connector
Step 1: Download and run the installation file
See: https://support.netdocuments.com/s/article/Fujitsu-ScanSnap-Connector
Step 2: Click Next

Step 3: Click I Agree and Next

Step 4: Click Just me and Next

Step 5: Click Next

Step 6: Click Close

Step 7: Launch the ndScanSnap Setup

Step 8: Click Initialize COM Objects

Step 9: Click Login into NetDocuments and enter your NetDocuments Login Information

Step 10: Click Allow
Step 11: Click Select Default Container

Step 12: Choose a default container
Just pick the main cabinet you will be scanning to.
Step 13: Check the rename file and Select Container

Part 2: Integration of the ScanSnap Software with NetDocuments
This all depends on which software you have installed. There are two ways outlined below.
Step 1: Go to the ScanSnap Icon in your system tray

Step 2: Right-click on the Icon and click on Scan Button Settings…

Step 3: Make sure NetDocuments is selected

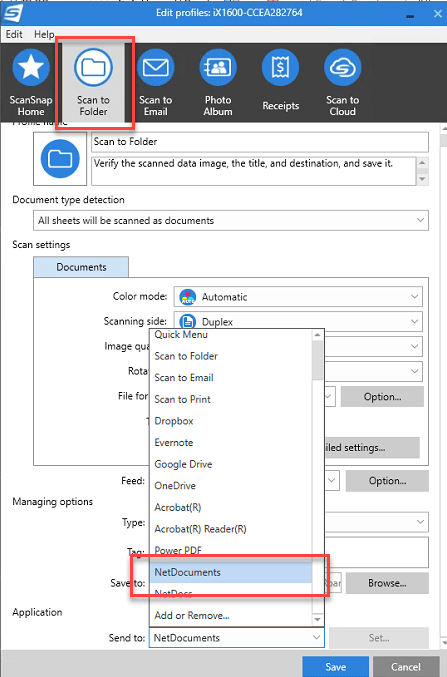
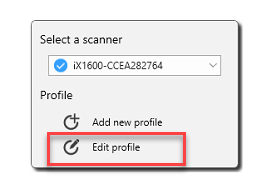
Step 1: Go to the ScanSnap Icon in your system tray
Step 2: Click Edit Profile
Step 3: Under Scan to Folder, Choose NetDocuments as the Application